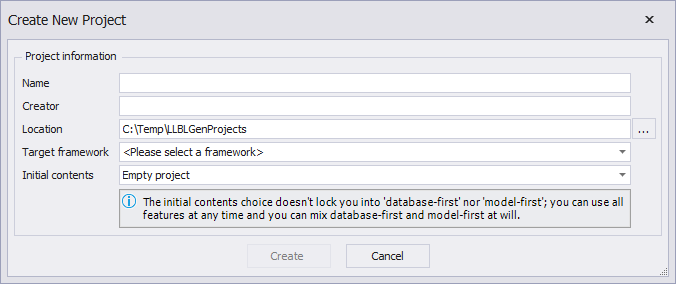
How to create a project
To create an Abstract Entity Model, you first have to create a project. Before you do that, please examine the Project Defaults in the Designer Preferences and edit them if necessary. The reason is that a created project's Project Settings inherit a lot of their values from the designer preferences.
NHibernate 3, Entity Framework 1, 4 and 5 are marked 'legacy', to make it easier for users to select the right framework. The 'legacy' marked frameworks are sorted below the latest versions of the supported framework.
Using the designer as stand-alone
Creating a project can be done in two ways: by clicking the New
Project... button on the toolbar or by selecting File -> New
Project from the main menu or by clicking the ![]() button on the toolbar.
A small dialog opens which asks you for the
project name, the name of the creator, the location, which target
framework to use and the initial contents of the new project. You can switch the target framework at any time.
The initial contents allow you to immediately start the wizard to retrieve relational model data from a database (work 'database first') after the project has been
created, add a relational model data container (work 'model first') or simply start with an empty project.
button on the toolbar.
A small dialog opens which asks you for the
project name, the name of the creator, the location, which target
framework to use and the initial contents of the new project. You can switch the target framework at any time.
The initial contents allow you to immediately start the wizard to retrieve relational model data from a database (work 'database first') after the project has been
created, add a relational model data container (work 'model first') or simply start with an empty project.

The Create Project dialog
Using the designer integrated in Visual Studio
To create a new LLBLGen Pro project inside Visual Studio, follow the same steps as when you'd want to add a C# class: either (preferred) use the Add New Item... menu option of the Visual Studio project or use File -> New -> File. Both options will offer you an option to select an LLBLGen Pro Project file. In the Add New Item... dialog box, you can find the LLBLGen Pro project file in the 'Data' section.
Creating a new LLBLGen Pro project through Visual Studio will create an empty file on disk and then open the LLBLGen Pro designer as an editor for this file. As the file is empty, it will show the Project Creation dialog which is also shown inside the LLBLGen Pro stand-alone designer when creating a project. You can't change the file location nor cancel this process at this point as it's a step inside a multi-step process inside Visual Studio.
When completing the dialog by clicking OK, the project will be created in the specified llblgenproj file and opened inside the LLBLGen Pro designer loaded inside Visual Studio.
As the designer integrated inside Visual Studio is actually the same designer as it's being used as stand-alone, it offers the same features as the stand-alone designer.
Next steps
By clicking OK you create the project and it will then show up in the Project Explorer. Depending on how you want to work, you can now proceed with working database first, or with working model first.
Please also consult the Feature Suggestions pane for hints what to do next.