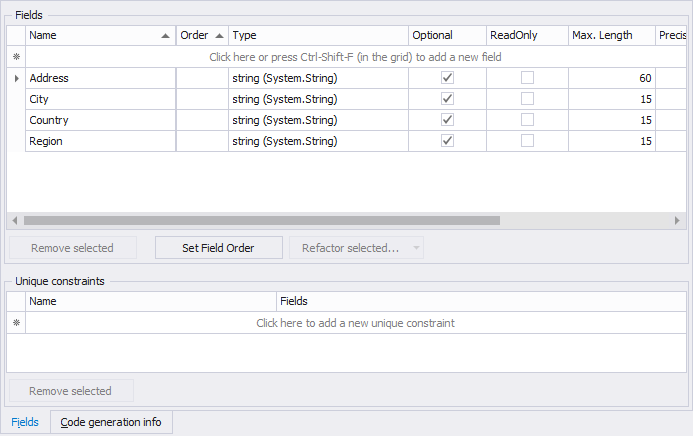
Value Type Editor, Fields Tab
The Fields tab of the Value Type Editor contains the information and editors for working with the fields of the value type definition and the unique constraints defined over these fields. The different parts are described below.

The Fields tab
Value Type Fields
The top half of the Fields tab is for the Fields area which let you
control the fields of the value type definition. The fields are shown in
a grid, and directly editable. To add a new field, click in the top-row
of the grid or (when the grid already has focus) press Ctrl-Shift-F to
add a new field to the entity.
You don't have to specify all the
columns, only the first two, Name and Type are mandatory. When you've
specified enough information for the field, press Ctrl-Enter to add the
field. A new field will automatically get a target field mapped, if the
designer can find an unmapped field in the mapped target element (if the
entity is mapped to a target (table/view) already) matching the newly
added field.
Editing fields uses type shortcuts for specifying types easily. You
can type the first characters of the type shortcut to make the grid
automatically pre-select the type(s) matching the characters typed, like
intellisense. Pressing TAB will move the focus to the next column. To
edit the Description, move to that column using TAB or cursor keys and
press Ctrl-DownArrow to open the small text editor to specify a
description for a field. Descriptions are generated as XML DOC comments
into the output.
To remove one or more fields, you have to select the fields using the row headers in the grid and click the Remove selected button at the bottom of the subtab.
Refactoring fields
The designer also supports refactoring of value type definitions by offering a small set of refactoring options for one or more selected fields. To perform a particular refactoring, select one or more fields to which the refactoring will be applied and click the Refactor selected... button at the bottom to select the refactoring from the list of available refactorings.
The following refactoring options are available:
- Bounce Value Types in Selected to Local Fields
- This refactoring will for each field in the list of selected fields replace that field with all the fields of the Value Type Definition it has as its type. If a field has a .NET type, it's not refactored. This refactoring can be useful when you have set the type of a field to a Value Type Definition but now you rather want to have the fields of the Value Type Definition local to the entity. It's the opposite of the refactoring Convert Selected into Value Type.
- Convert Selected into Value Type
- This refactoring creates a new Value Type Definition (using the information you specify in the popup dialog shown) with the fields selected in the value type editor and replaces all selected fields with a new field which type is set to the just created value type definition.
- Replace selected fields with existing value type
-
This refactoring replaces the selected field(s) in the field editor with a matching existing Value Type. This refactoring is similar to Convert Selected into Value Type, however instead of creating a new Value Type, it uses an existing Value Type, if available. Which value types are offered through the refactoring menu depends on a couple of factors:
- The value type must be in the list of field types offered in the field editor. This is a safe way to filtering out value types which could lead to a cycle. As the field which will be a field like any other in the element and it will get the type of the valuetype chosen, it's equal to selecting a field's type through the list of available field types.
-
The value type must have the same number of fields selected and
the types must match, and if there are multiple fields with the
same type, the field names, lower case compare, must be equal.
Example: if there are two fields selected,
F1andF2, bothstring, and there's a valuetype with twostringfieldsF1andf2, it is a match. This might be very strict, but it's otherwise a gamble: if there are two fields with the same type, it's not possible to replace them with fields inside a valuetype
Unique constraints
The bottom area of the Fields tab is the area where you can define unique constraints for the value type definition.
To define a unique constraint, click in the top row of the grid and specify a valid name for the unique constraint. The second column is an editor which opens in a separate dialog which allows you to select the field(s) of the unique constraint. Press cntrl-enter to add the row to the grid, which adds the unique constraint to the value type definition.
To remove a unique constraint from the list of unique constraints of a value type definition, simply select it and click the 'Remove selected' button at the bottom.