Designer - Working with plug-ins
Preface
LLBLGen Pro supports a flexible plug-in system which allows developers to extend the existing functionality of the designer.
Plug-ins can target single elements, multiple elements or both, designer events or be a system plug-in and act like a part of the designer. They can run as a pop-up dialog but they can also run as part of the designer in a tab, like the entity editor.
LLBLGen Pro ships with a variety of plug-ins, from plug-ins to add/remove interfaces or custom properties to a full project inspector plug-in which runs
as a tab inside the designer and which allows you to inspect the full object model of an LLBLGen Pro project to pluralization and singularization plug-ins.
This section describes how to use plug-ins in the designer. The LLBLGen Pro SDK offers a more in-depth look how to write your
own plug-ins. The LLBLGen Pro SDK is available for customers free of charge and comes with the sourcecode for all the plug-ins shipped with LLBLGen Pro.
Viewing installed plug-ins
Plug-ins are implemented in any .NET language and derive from the generic Plugin base class in the LLBLGen Pro ApplicationCore assembly. Assemblies with
plug-in implementations are placed in the
Plugins folder in the LLBLGen Pro installation folder. At startup, LLBLGen Pro examines these assemblies and
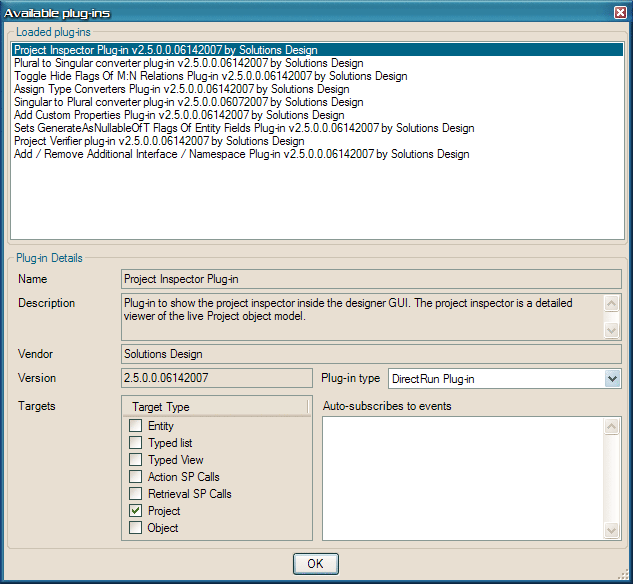
will make sure that every plug-in available is runnable by the user. To examine which plug-ins are available to you, what the types are they target, and
versioning information, you can view them in the dialog popped up after you select
Tools - >
Plug-ins. The following screenshot shows
an example of this dialog.

The view available plug-ins dialog
A plug-in can be of the following types:
- Single element. This is a plug-in which can only target a single element, like a single entity
- Multi element. This is a plug-in which can target one or more elements and which is always run with the object selector (see below, running
plug-ins on multiple targets)
- Single element and multi element. This is a plug-in which can do both single and multi element actions
- DirectRun. This is a plug-in which won't pop-up the plug-in run dialog, but will start automatically once selected from the plug-in menu on
a target. An example of this is the project inspector plug-in which is available on the project node. (Right-click the project node in the
Project explorer, select Run plug-in -> Project inspector. It will directly open a tab with the project inspector in the tab area of the designer.
- Be a handler of a Designer Event. Designer events are events raised by the designer in a wide range of occasions and to which you can bind a plug-in to handle the event or even cancel the whole action raising the event. See the paragraph about Designer Events below for more details.
The type of the plug-in is set by the plug-in itself. You can't change it in the plug-in viewer dialog.
Running plug-ins on a single target
Running a plug-in on a project element is easy: just right-click the element in the project explorer,
which can be an entity, typed list, typed view or a stored procedure call,
and select from the context menu Run Plug-in and select the plug-in to run. The Run Plug-in dialog will pop up, allowing you to specify specific
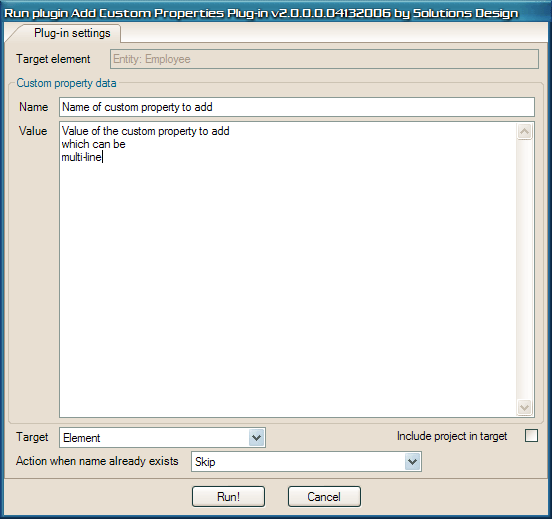
settings for the plug-in before it is run. It depends on the plug-in which settings you'll have to set. The shipped plug-in shows the following dialog:

Run the Add Custom Properties plug-in on a single element
By clicking the Run! button, the plug-in is executed on the element selected. A progress bar is shown to give feedback of the progress of the plug-in
execution.
Running plug-ins on multiple targets
Running a plug-in on multiple elements starts by the same actions as running a plug-in on a single element: right-click a node in the project explorer,
which can be the project node, the 'Entities' node, the 'Typed Lists' node, the 'Typed Views' node, the 'Retrieval Stored Procedure Calls' node or the
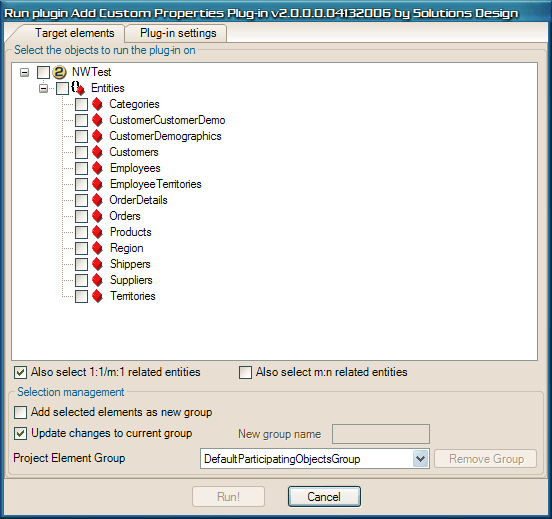
'Action Stored Procedure Calls' node. The Run Plug-in dialog will now have two tabs, instead of one. The first contains the object selector which is
also available to you in the
Generator configuration window. The second
tab contains the same information as seen in the single target run of a plug-in: the settings for the plug-in to run. The following screenshot
shows this dialog:

Run the Add Custom Properties plug-in on multiple elements
The object selector is discussed more in detail in the following section.
selecting participating objects
To select the elements to run the plug-in on, LLBLGen Pro uses an object selector component, which is also used in the generator configuration window when
you click 'Select participating objects'. It allows you to select one or more elements by checking their checkboxes and store that selection under a name,
called a
group, update an existing group with the selection made, remove a previously created group, or simply select a previously created group as
the set of elements to select. Groups are stored with the project and can be used whenever the object selector is used.
The object selector also offers automatic selection of elements related to a selected element, based on 1:1/m:1 relations or m:n relations. It furthermore
selects entities in a typed list if the typed list is selected.
Designer Events and plug-ins
LLBLGen Pro's designer has the ability to call plug-ins when some event occurs, a so called
designer event. Designer events are very powerful as they can automate a lot of thing in the designer. There are two types of Designer Events: cancelable designer events and normal designer events. The cancelable designer events
are raised by actions which can be canceled by the result of the event, provided by the handler of the event. This way, a plug-in could verify if an action can take place and deny it if some check fails.
Plug-ins can be bound to designer events. This means that a plug-in is executed when the event is raised. This binding can be created by the plug-in itself: plug-ins can
auto subscribe to designer events. The designer ships with one example of that: the
Project Verifier plug-in, which is bound to the designer event
CodeGenerationBeforeStart automatically. The plug-in verifies if the project is valid before code-generation can take place. If something is wrong which would lead to incompilable code, the plug-in will cancel the action (so the start of the code generation will be aborted) and the result will be displayed. Auto-subscribed plug-ins are always subscribed to that event, you can't remove them from the event.
You can also bind a plug-in manually to a designer event. To do that, select
Tools ->
Bind Designer Events to Plug-ins...
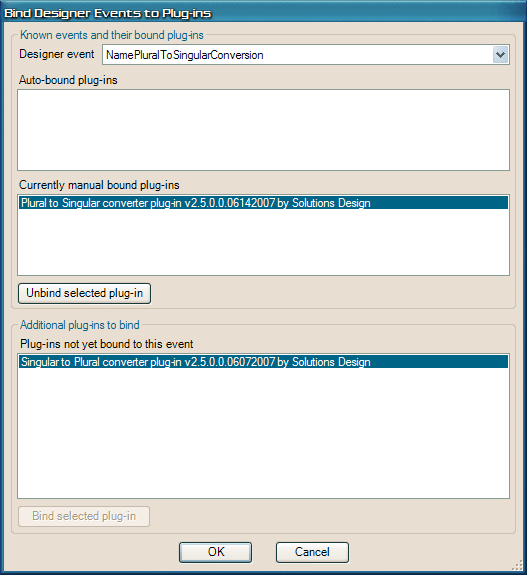
The following dialog will pop-up:

Bind designer events to plug-ins
This dialog will allow you to select a designer event and per event to bind one or more of the plug-ins available for binding to that event. In theory, you can bind any of the shipped plug-ins to designer events, if the event is related to one of the targets the plug-in works on. In practise only the plug-ins which are really meant to be plug-ins for designer events are really useful for using with designer events. Two of them are the pluralization and singularization plug-ins, discussed in the next paragraph.
For more details about designer events and how to write a plug-in to handle these events, please consult the LLBLGen Pro SDK documentation and sourcecode.
Setting up pluralization and singularization of names
Two of the
designer events which can be used directly with the shipped plug-ins are
NamePluralToSingularConversion and
NameSingularToPluralConversion, which are the events for resp. singularization of a name and pluralization of a name.
Using the dialog to bind designer events to plug-ins you can bind the
Plural to Singular converter plug-in to the
NamePluralToSingularConversion event
and the
Singular to Plural converter plug-in to the
NameSingularToPluralConversion
event. An example of that is shown in the above screenshot. These plug-ins are based on the Castle Project's Inspector class for singularization/pluralization of English names. As this is an Open Source project, the sourcecode of this class is available in the SDK sourcecode, available to all LLBLGen Pro customers in the customer area. If you're using a different language, you can change this class or replace it entirely with a class which can handle the pluralization / singularization rules for your language to create a different plug-in for your language and bind that plug-in to the two conversion designer events instead.
After you've bound these two events to their plug-ins, LLBLGen Pro is able to pluralize and singularize names it encounters and has to format for you.
There are a couple of spots in the designer where singularization has to take place and pluralization has to take place.
For entity names, discovered from targets, the singularization plugin is always called. If it’s not there, the name to process didn’t change, so nothing changed. For 1:n relations, the field could be constructed by pluralizing the related entity name. This is also the case with m:n relations. To specify this, you should use the macro for that in the FieldMappedOn*Patterns (See for more details about these patterns the Designer - Preferences and Project properties section). Standard, the macro is $EndEntityName. The plural equivalent is $EndEntityName$P. When that $P macro is specified as a suffix, the event is raised for pluralification of the entity name of the end entity. There’s also a singular macro: $EndEntityName$S. The $S and $P macro also work on IntermediateEntity.


