Designer - Creating a project
Preface
LLBLGen Pro uses database drivers to connect to database servers and retrieve schema information. Per database driver it has specific
database connection information screens, which are part of the Create New Project window. In this example, we use the SqlServer
driver and the SqlServer connection information screen, so when you want to use for example the Oracle 8i/9i driver, the controls may vary, however
each connection information screen has tooltips and the layout itself should be straight forward.
For any application you wish to use LLBLGen Pro for, you start by creating
a new project. You do this by either clicking 'File --> New Project' in the menu, or by pressing Ctrl+N on your keyboard.
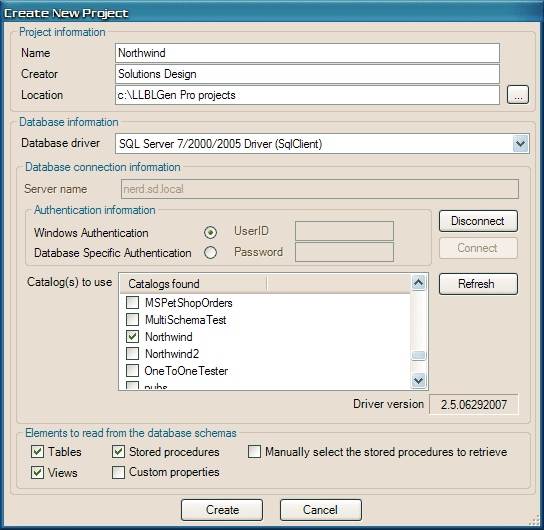
This will pop up the following screen:

Project information
In the 'Project information' part of the screen you fill in the
name of your project and the name of the
creator.
The name of the project will also be used for the filename of the project file. The location where this file will be stored
can be selected by clicking the browse button next to the location text box.
Database information
The Database information part of the 'Create a project'-screen will not be editable until after you fill in the Project information data.
You then select the database driver to use. This example assumes picking the SqlServer 7/2000/2005 driver, which will show the SqlServer
connection information screen inside the 'Database connection information' area. It asks for the following information:
- Type in the server name on which the database resides. This can be an IP number as well.
- Use the radio buttons to choose whether you need to log on to the server using Windows Authentication, or to log on
using Database Specific Authentication.
In the latter situation, you'll need to fill in your User id and password.
- Press 'connect'. Your system will log on to the server and search for catalogs (schema sets) stored there.
- On SqlServer you can now select one or more catalogs you wish to target. On Oracle you can select one or more schemas you wish
to target. On other supported databases, just one database (file)/schema is supported, except on DB2, where one catalog with
multiple schemas is supported.
After you've chosen the catalog(s) to use for this project, you should decide which elements you want to retrieve from the schemas of these
catalogs one which the project will be based. Initially tables and views are checked and Stored Procedures and Custom Properties are not checked.
Custom Properties is checked based on the value for the
user preference RetrieveDBCustomProperties.
It is recommended that if you are not planning to use the custom property values defined
with the various database elements (like tables and views) or you're not planning to use the stored procedures in the schemas, you should leave these
elements unchecked so project creation is faster and your project file will be smaller.
When you've selected the elements you want to retrieve from the catalog(s),
you click Create and all metadata of all the schema(s) found in the selected catalogs is read.
This information is embedded in the new project and the connection with the database is closed: because all schema information is read, you
do not need a connection with the database anymore, until an element in the schema is changed and you have to refresh the catalog in the
project. See for details about refreshing the catalog
Refreshing the catalog schemas.
Setting stored procedure information
If you've decided to retrieve stored procedure meta-data as well, and you've set the
user preference
ManualSelectSProcsFromSchema to true, (and
if you're using SqlServer or Sybase ASE:
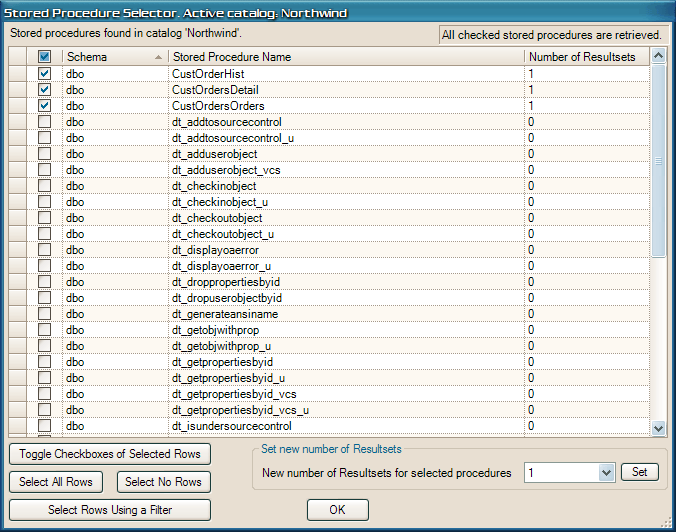
AutoDetermineSProcType to false), per catalog (or on Oracle: per schema), the following screen will pop up,
allowing you to select the stored procedures you'd like to include. On SqlServer, you'll also be able to set the number of resultsets for each stored procedure.
By using filtering you can select a lot of procedures at once and set their number of resultsets with one click. Procedures which return 1 resultset will
be generated as procedures which return a DataTable. Procedures which return 2 or more resultsets will be generated as procedures which return a
DataSet. Only the meta-data of the checked stored procedures is retrieved, which can speed up project creation and limit project file size, if you
need just a few procedures from a large set of procedures in the catalog(s)/schema(s) you have to target.

When the project is created without errors, the Create New Project window is removed and the project is visualized in the
Project Explorer.
The project is not saved yet nor are there any elements added to the project. With a new project just created it is a good time to open the
project properties and set them to your needs. Especially the prefixes to strip off of table names, view names to construct entities and
typed view names can be helpful. These values are inherited from the
user preferences,
so if you've set them already there and they
don't need to be changed for this new project, you can move on directly to the subject of adding elements, like entities, to the project.
SqlServer specific warning
(Only applicable if you've set the
user preference SqlServerAutoDetermineSProcType to true)
LLBLGen Pro needs to know how many resultsets a stored procedure returns: 0, 1 or more than 1. SqlServer doesn't store this information, though it
provides a mechanism to determine the number of resultsets of a stored procedure: through using SET FMTONLY ON before calling a procedure. When
SET FMTONLY ON is called before the actual proc call, no data nor schema is affected by the procedure. This technique is for example used by
SqlDataAdapter.FillSchema. LLBLGen Pro's SqlServer driver uses that routine to determine the number of resultsets per stored procedure.
While this is safe, datawise, it can be that a stored procedure executes non-DML actions, like sending an email or starting a SqlServer job.
You should be aware of that before you retrieve the stored procedures from the catalog you connect to. If you are unsure what the effects will be,
either set the
user preference SqlServerAutoDetermineSProcType
to false or use the following trick:
extract the DDL schema from SqlServer for your catalog using the Enterprise Manager and create with it a different catalog in your SqlServer
instance and remove the stored procedures you're not going to use in the LLBLGen Pro project from that new catalog,
and use that catalog to create your project with.
Assembly load resolving file
During the process when an LLBLGen Pro project file is loading, it can be that some types are found in the project data which can't be resolved as the
assembly these types refer to as their container aren't found by fusion (.NET's assembly loaded technology).
The designer then typically pops up an OpenFile dialog to let the user browse to the assembly which couldn't be loaded. This is necessary as the
project data might contain the location of the assembly (e.g. the project property
AdditionalTypeConverterFolder) but this is not yet available.
As this can be cumbersome, a more automatic solution is available. This is the assembly load resolving file, which is a file which contains, per assembly name,
the real path of the assembly, so when a type load error occurs the assembly can be retrieved from that location. The file has to be created manually by the
developer and has to have the name:
projectname.lgp.assemblylocations. (casing isn't important). So when your project is stored in
Northwind.lgp, the assembly load resolving file should be: Northwind.lgp.assemblylocations. This file is only required if you experience assembly load errors.
In the assembly load resolving file the assembly names and exact locations have to be specified in a simple XML format:
<assemblyLocations>
	<assemblyLocation name="..." filename=".." />
	...
</assemblyLocations>
Where
name is the full name of the assembly.
Filename is path + filename where the assembly can be found.
If the path starts with '..\' or '.\' it is considered relative to the project file location, otherwise it's considered a full path.
If an assembly couldn't be found and it's also not found in the list of assemblyLocations, the dialog is still used to resolve a missing assembly.


